Guess What I've Been Doing This Month!
- Mini Michelinista

- Jul 10, 2021
- 7 min read
If you guessed that I've been taking a baking class online, you're right!! My mom signed us up because she thought it would be a fun thing to do together after she'd had to spend so much time away from us being at the hospital after my new sister was born. Our class was taught by Christina Tosi, who is the owner, founder and chef of Milk Bar, which is a famous bakery. The original one is in New York, and we first went there a long time ago. There's a newer one in Harvard Square near where we live, but I haven't been to that one yet. Now that I kind of know Christina, maybe I'll go!!!! You can learn more about Christina and Milk Bar by watching the Chef's Table episode about her. Chef's Table is a really good show where you learn all about famous chefs!
Christina is a great pastry chef and has actually won two James Beard awards, but my family has never loved Milk Bar that much. But one of the many things that we learned from taking this class is that her recipes are actually AMAZING when you make them yourself at home. It really shows you how much better home baking is than anything that is mass produced for a chain, even if it's made from a really great place.
We got a whole list of equipment and specialty ingredients that we had to order before the class started. We already had a lot of the stuff, but there was also a lot that we'd never used before and some of it that we'd never even heard of! When the box arrived with everything that we ordered, it was really big!!
The class was organized into three sections. For each section, we made a famous Milk Bar recipe and then had to make up our own recipe in the same category. This was totally new for us because we've never really created our own recipes before, but I was excited to try it. I have a whole notebook of recipes that I've kind of made up, but I've never actually tried any of them before.
The first section of the class was Cookies. First we made the Milk Bar Cornflake Chocolate Chip Marshmallow Cookies. Christina's recipes all have sub-recipes in them. They're recipes where you make something that then goes into the main recipe. For these cookies, first we had to make a cornflake crunch, that eventually got mixed into the cookie dough.
These cookies were unbelievably good! They were crispy on the outside and soft and chewy in the middle and soooo delicious.

When it came time to make up our own recipes, Christina had us start by creating a "flavor story." For our cookie recipe, Christina had us choose a time as our inspiration. We chose my younger sister's preschool graduation, which is called Fly Away. We had vanilla cupcakes and customized oreo cookies there and so we wanted to create a cookie that combined the flavors of oreos and vanilla cupcakes.
One really interesting thing that we learned from this class is that you can grind up almost anything and use it as a replacement for flour. So for our cookies, we broke apart oreos and ground the chocolate cookie part in the processor.


We also decided that if you could replace some of the flour, maybe you could replace some of the butter too, and so we decided to use some of our oreo filling as fat in the cookie batter! We used butter and cream cheese too.

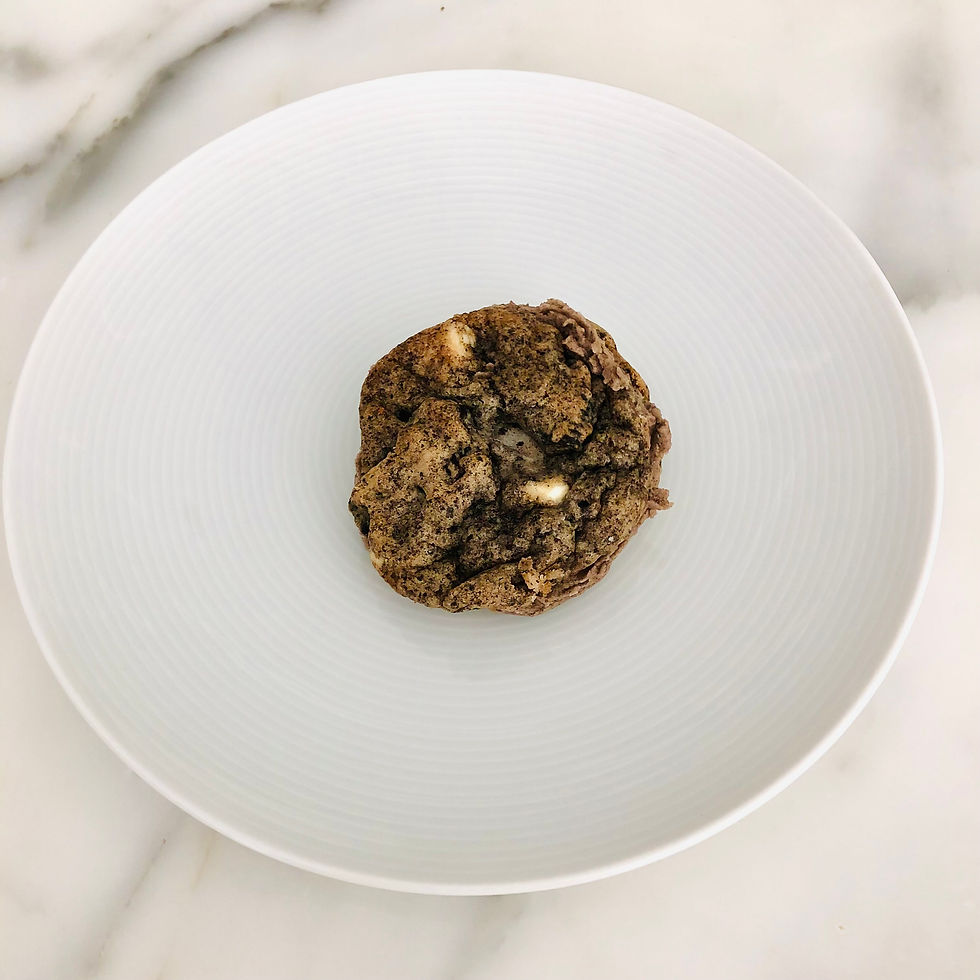
But since we were trying to combine oreo and vanilla cupcake flavors, we decided that we should use buttercream to make sandwich cookies. So we made oreo buttercream!

Then we piped the buttercream between the cookies to create our sandwiches.

The next section of the class was Pie! The first recipe that we made was Milk Bar Pie. Milk Bar Pie used to be called Crack Pie and it was one of the recipes that made Milk Bar really famous when it opened. But they changed the name because crack is an illegal drug that has made lots of people really sick and so they apologized after they realized that it isn't funny to joke about. I'm glad that they changed the name. Sometimes I see people addicted to drugs living outside near where my mom works and I think that's really sad.
The first step to making Milk Bar Pie is to make a giant oat cookie. You end up just grinding up the cookie to go into the crust, but we want to bake these just as regular cookies sometime because this was delicious!

We ground up the cookie to make the crust.

The filling was made with lots of ingredients, but one of them was freeze dried corn powder. We couldn't find the powder to buy, so we just bought freeze dried kernels and ground them up ourselves. Corn might sound weird in a pie, but it gave amazing flavor!

A very interesting part of making this pie is that after it is baked, you freeze it overnight!

One of my favorite things about this pie is that the pieces are firm, so you just pick them up and eat them like slices of pizza! We brought one of these pies to the beach on my dad's birthday and it was perfect because we just kept the sliced pie cold in a cooler with ice and then it was easy to serve and eat.

Usually when people think of pie, they think of a pastry crust and a traditional filling, either fruit or another common pie like pumpkin, pecan, coconut cream or lemon meringue. One of the things that I really liked about making this pie is that it ended up being very different from the kinds of pie that most people are familiar with.
Then it came time to make our own pie! This time, our flavor story was supposed to be based on a place. The place that we ski in Montana has little huts all over the mountain, filled with candy and other snacks. They're called Sugar Shacks, and I decided that I wanted to bake a pie based on that. I thought that the Sugar Shack idea would be especially good for a pie because we could do different layers, to incorporate the flavors of different snacks that they have in the Sugar Shacks.
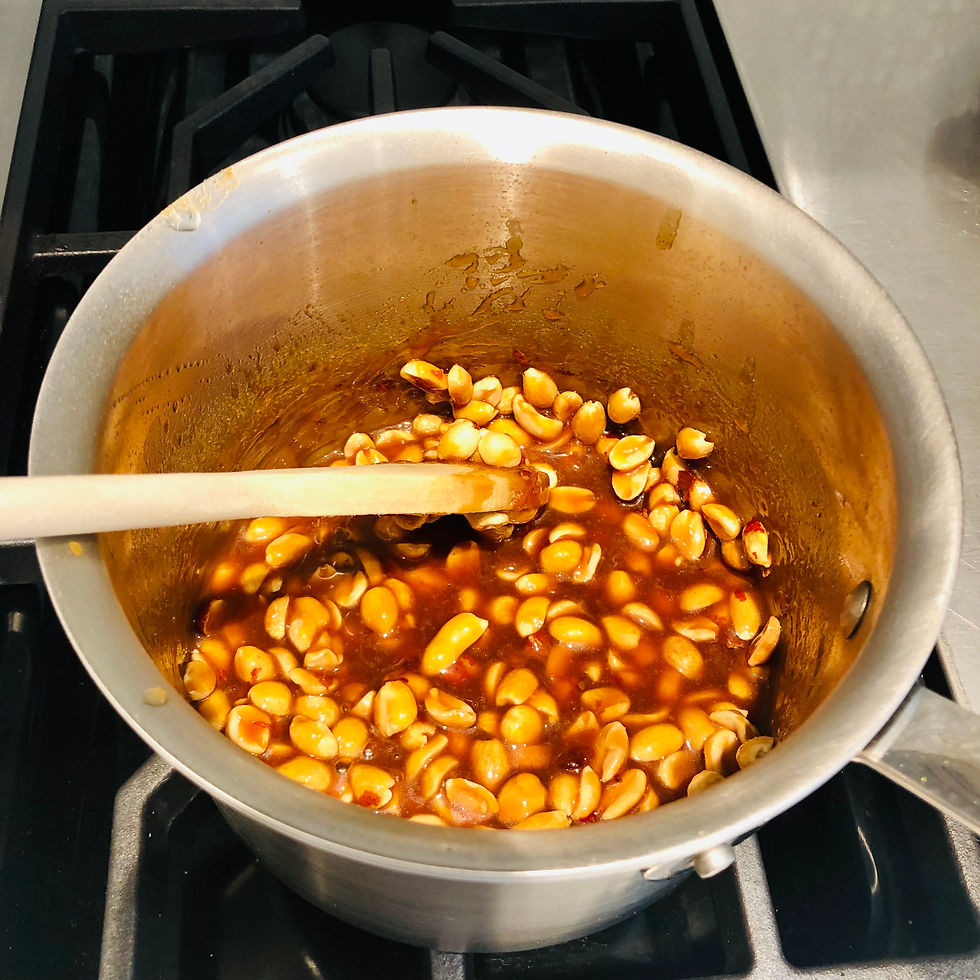
My mom's favorite Sugar Shack snack is to mix pretzels and wasabi peas. We decided that wasabi peas probably wouldn't be great in a pie, but we thought that pretzels would be perfect for our crust because we could grind them up. And we decided to add in roasted peanuts too because lots of our favorite Sugar Shack candies have peanuts in them. Just like we used the oat cookie mixture to add flavor to our Milk Bar Pie, we used pretzels and peanuts to create a crust flavor in our own pie.

Next we made a peanut butter filling. We used peanut butter and mixed it with cream cheese, confectioners sugar, vanilla and whipped cream to lighten it.

We also made a caramel peanut sauce. We based this layer on part of a dessert that my Grandma Linda makes that is supposed to taste like a Snickers candy bar because we definitely have Snickers in the Sugar Shacks!
We filled the crust with our peanut butter layer and let it chill in the fridge.

Then we topped the cream cheese layer with our caramel peanut mixture.

Our last layer was a marshmallow whipped cream. Usually we make our own marshmallow meringue for toppings, but for this we just mixed marshmallow fluff into whipped cream and it worked perfectly!

And that is how you make Harper's Original Sugar Shack Pie!If you want the recipe, just let me know! I already asked my mom if we could make it again for my birthday!! My dad said that this was one of the best things we'd ever made and that we could sell them. The only problem with it is that the pie is very messy when you slice it. But we also thought that you could use all the same components but layer it into jars for a jar dessert. I think those would be fun to serve at a party!
The third section of our class was cake. First we made Milk Bar's Birthday Layer Cake. This recipe had four components: the cake (Christina calls this layer the sponge), a soak, a crumb and a frosting. We had to use a bunch of new ingredients that we hadn't baked with before for this recipe, including glucose syrup and citric acid. We also used clear vanilla extract. I didn't even know that was a thing before! But according to Christina, dark vanilla has more depth of flavor and is heavier but clear vanilla is lighter and just brings out vanilla flavor.
The first thing that we made was the crumb.

Then we baked a Birthday Cake Sponge. It was basically a funfetti cake, but it is very soft. You bake it in a quarter sheet pan and then use a cake ring to cut out circles of it that get layered into the cake ring with a sheet of acetate to hold the higher layers all together.

We forgot to take a picture, but we made a soak with milk and vanilla that got drizzled over each cake layer. Then we made buttercream that we layered on top of the cake and the crumb.

The final cake was fantastic. Everybody LOVED it!!!!!

Then our final project was to create our own cake recipe. This time our flavor story had to be based on a specific food. We were supposed to create a recipe that highlighted the flavor of our inspiration food and then also incorporate other ingredients to highlight it.

We decided that heath bars would be a good ingredient to highlight the sponge candy flavors and so we baked a heath bar cake for our sponge.

Then we made a caramel sauce for our soak.

And we made a second caramel sauce that became the base for a caramel buttercream.

First we layered the sponge in the cake ring and acetate.


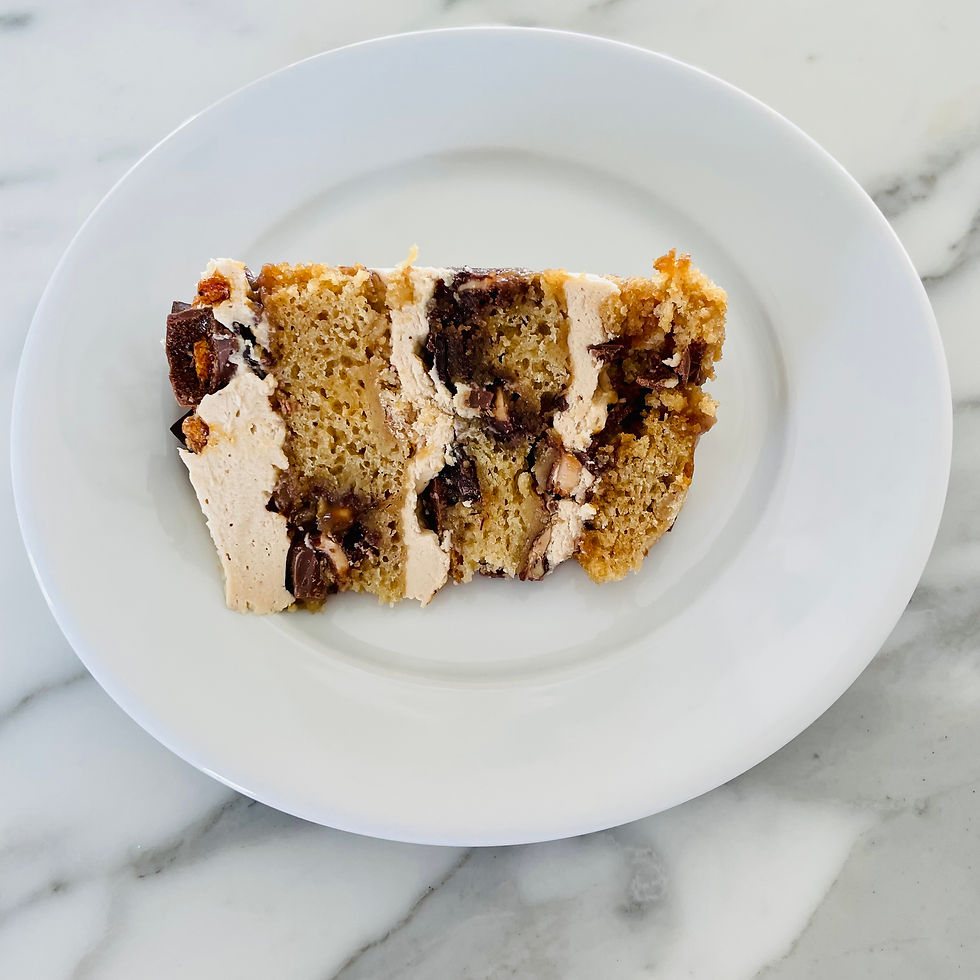
If we make this cake again, I think I'll add more salt to the buttercream. It was very sweet. My dad thought that we should add more caramel and less buttercream, but I worry that more caramel might just turn the whole thing into a wet goopy mess!
Overall, I'm so happy that we took this class. I learned lots of different ways to find inspiration and how to make my own recipes. And I learned new techniques that I think I'll be able to keep using in my baking. Let me know what you think of our creations!!!!


What delicious recipes! I can't wait to try some of your creations this weekend.
Xo!
-Kelsie
I was totally fascinated by this post. I think you learned a lot and used the techniques and your own creativity to form wonderful desserts. BRAVO!
At one time your Mom and I talked about taking a cake decorating course but we never did. I am so glad that you and she have done so.
Love, Grandma Linda